How to Install Cobblestone Paving for Your Outdoor Projects?

Time:2026-05-11 Author:Isabella
0%

Installing cobblestone paving can elevate your outdoor projects. As expert landscaper John Mitchell emphasizes, "The right techniques make all the difference." Cobblestone paving not only adds beauty but offers durability. However, the process can be tricky for beginners.

Understanding how to install cobblestone paving is crucial. It requires proper planning and knowledge of materials. Missteps can lead to uneven surfaces or drainage issues. Many homeowners struggle with getting the layout right. A common mistake is not preparing the base adequately.

Attention to detail is key in this project. The selection of cobblestones matters. Each stone should complement your outdoor design. Remember, proper installation affects the long-term results. Take the time to measure and plan carefully. Don't rush through this important process.

How to Install Cobblestone Paving for Your Outdoor Projects?

Tools and Materials Needed for Cobblestone Paving

When planning to install cobblestone paving, having the right tools and materials is essential. Start with a solid base; gravel and sand are common choices. For a professional finish, a compacting tool and a level are indispensable. A rubber mallet helps set the stones without damaging them. According to the National Association of Home Builders, using high-quality materials can significantly enhance durability.

Safety gear is necessary. Wear gloves and safety glasses to protect against debris. A knee pad will make your work more comfortable during long installation sessions. Reports indicate that improper installation can lead to shifting stones and cracking, which is often due to inadequate base preparation.

Invest in a good sealer for your cobblestones. This can add a protective layer against stains and weather damage. However, applying too much sealer or unevenly can lead to an unsightly finish. Balancing aesthetics and functionality is key. Be mindful of the patterns you choose; not all designs hold up equally well under pressure.

How to Install Cobblestone Paving for Your Outdoor Projects? - Tools and Materials Needed for Cobblestone Paving

Tool/Material Description Quantity
Cobblestones Natural stone pieces used for paving Varies by area
Gravel Base layer for drainage and stability 1 ton per 100 sq ft
Sand Filling material to set stones 0.5 ton per 100 sq ft
Shovel For digging and moving soil 1
Level To ensure even surface 1
Rubber Mallet To set cobblestones in place 1
Edging Material To contain the stones and provide a border As needed
Jointing Sand Used to fill spaces between cobblestones 0.25 ton per 100 sq ft

Preparing the Site for Cobblestone Installation

Preparing the site for cobblestone installation is crucial for achieving a durable and attractive outdoor surface. Start by assessing the area where you plan to install the cobblestones. The ground should be firm and well-drained. According to recent industry reports, nearly 30% of paving failures stem from inadequate site preparation. This highlights the importance of proper groundwork.

Remove any grass, plants, or debris from the site. Dig down at least 6 to 8 inches to create a solid base. Consider using a compactor to ensure the sub-base is stable. A mix of crushed stone or gravel is recommended for optimal drainage. Remember to lay a fabric barrier to prevent weeds, which can disrupt your paving in the long run.

**Tips:** Ensure your workspace is level; uneven surfaces can lead to shifting over time. Check for drainage slopes, directing water away from your foundation. Lastly, inspect your measurements to avoid costly mistakes during installation. Proper site preparation sets the stage for a lasting and visually appealing cobblestone project.

Laying the Cobblestones: Step-by-Step Guide

Laying cobblestones can be an enriching experience. It enhances outdoor spaces and adds aesthetic appeal. According to a recent industry report, over 55% of homeowners prefer natural stone materials for their hardscaping projects, and cobblestones are a popular choice.

Before diving into the installation, preparing the base is crucial. Start by excavating the area to a depth of at least 8 inches. Use a compacting tool to ensure the ground is firm. A stable base prevents future shifting. Aim for a thickness of 4-6 inches of gravel. Studies show that proper base preparation can increase the longevity of cobblestone installations by up to 30%.

When laying the cobblestones, it’s essential to adopt a pattern. Start from a corner and work your way across. Gaps should be filled with sand, ensuring stability. Watering the sand helps settle it into the joints. Many find this tedious. Yet, attention to detail during this stage is vital. Failing to secure the edges may lead to cobblestones shifting over time. Aim for a uniform look, but slight imperfections can add character. Reflect on the process; each stone laid tells a story.

Finishing Touches: Grouting and Sealing the Cobblestones

When grouting and sealing cobblestones, attention to detail is key. Begin with selecting the right grout. A sanded grout works well for larger joints, while un-sanded grout is better for smaller spaces. This choice impacts both the aesthetics and durability of your project. Apply the grout using a float, pressing it firmly into the joints. Make sure to remove excess grout promptly to prevent it from hardening on the surface.

Tips: Always test the grout on a small area first. This helps you see how it interacts with your cobblestones. Adjust the mix if the color isn’t quite right. After the grout has set for the recommended time, it's crucial to seal the cobblestones. A good sealant prevents stains and water damage. Use a high-quality sealant that allows breathability. Applying too thick of a layer can result in a cloudy finish.

Finally, don't rush through this process. Take your time to ensure an even application of both grout and sealant. If you notice uneven spots, consider reapplying the sealant for a uniform look. Sometimes, the results may not match your expectations. Reflect on what you can improve next time to avoid the same issues.

Installation Steps for Cobblestone Paving

Maintenance Tips for Long-Lasting Cobblestone Paving

Proper maintenance of your cobblestone paving is essential for its longevity and aesthetic appeal. Regular cleaning is vital to prevent the buildup of dirt and moss. A simple broom can be effective in removing loose debris. For stubborn stains, using a gentle pressure washer can help without damaging the stones. Be cautious on edges; they can chip easily.

It’s also important to address weeds promptly. These can take root in the joints between cobblestones. A mixture of vinegar and water can be an eco-friendly solution to kill weeds without harming the stones. Additionally, replenishing joint sand can prevent shifting. Over time, the sand may wash away, so topping it up every season is beneficial.

Consider the weather's impact on your paving. Extreme temperatures can lead to cracks. If your area experiences heavy rainfall, make sure water drains away from the cobblestones. Monitor for signs of settling or unevenness, as this can indicate underlying issues. Reflect on these aspects regularly to ensure your cobblestone paving remains functional and attractive.

FAQS

: How should I prepare the site for cobblestone installation?

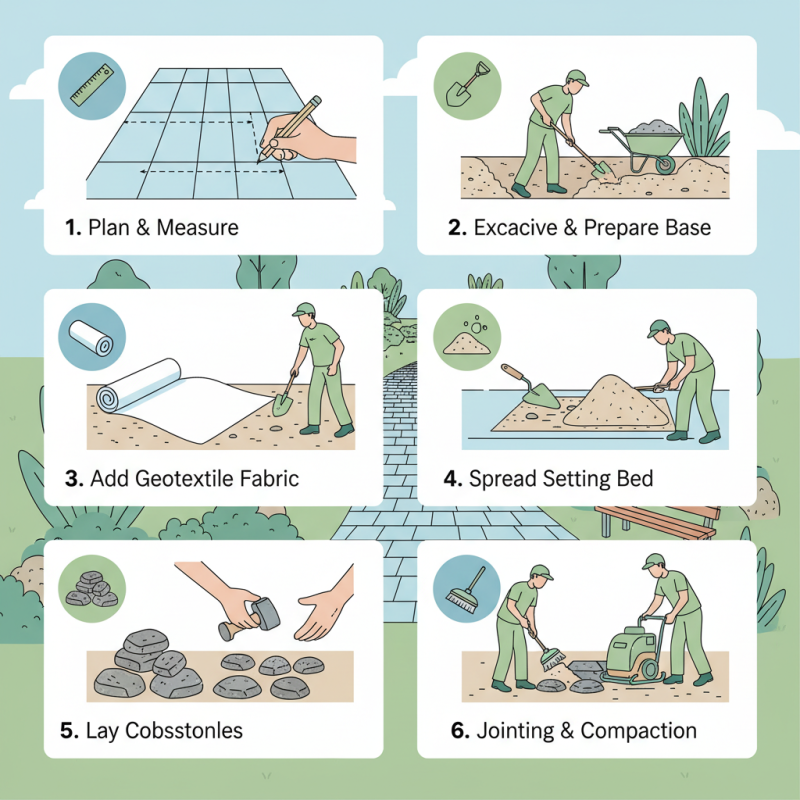
: Start by assessing the area. Remove grass, plants, and debris. Dig down 6 to 8 inches for a solid base.

What materials should I use for the sub-base?

Use a mix of crushed stone or gravel. This aids in optimal drainage and stability for paving.

Why is it important to lay a fabric barrier?

A fabric barrier prevents weeds from disrupting your paving over time. Weeds can create long-term issues.

How often should I maintain cobblestone paving?

Regular cleaning is essential. Use a broom for debris and a pressure washer for stubborn stains.

What's a natural way to kill weeds without harming cobblestones?

A mixture of vinegar and water works well to eliminate weeds in the joints.

How can I prevent shifting in my cobblestone paving?

Replenish joint sand regularly. Sand can wash away, and topping it up every season is beneficial.

What should I monitor for with my cobblestones?

Keep an eye on drainage and signs of settling. Unevenness might indicate underlying issues that need attention.

Are there any impacts of weather on cobblestone durability?

Yes, extreme temperatures can cause cracks. Proper drainage is vital during heavy rainfall to protect your paving.

Conclusion

This article provides a comprehensive guide on how to install cobblestone paving for your outdoor projects. It begins by listing the essential tools and materials required for the installation, ensuring you are well-prepared before starting. The next step involves preparing the site, which is crucial to achieving a stable and long-lasting surface.

Following the preparation, a step-by-step guide explains how to lay the cobblestones effectively, emphasizing the importance of precision and technique. Once the cobblestones are in place, finishing touches such as grouting and sealing are discussed to enhance durability and aesthetics. Finally, the article offers maintenance tips to keep your cobblestone paving looking its best for years to come. This guide serves as a valuable resource for anyone interested in understanding how to install cobblestone paving correctly.

Isabella

Isabella

Isabella is a dedicated marketing professional with a sharp focus on driving brand growth and engagement through strategic content creation. With an extensive background in digital marketing, she combines her passion for storytelling with her keen understanding of industry trends to deliver......